Watermelon Punch
By Eliza Neeley
With a mixture of tangy lemon, mint leaves, and refreshing watermelon, treat yourself to the perfect summer refreshment. Adding this yummy punch
Ingredients:
2 tbsp honey
1/2 tbsp lemon juice
3 cups of watermelon
Handful of chocolate mint leaves or normal mint leaves
¼ cup apple juice
One lemon
Raspberries
Blender
Knife
Spoon
Instructions:
- If you want to use the watermelon shell as a punch bowl then cut the top third off of the watermelon and scoop out the watermelon from the inside. Cut a small section off the bottom of the water melon so it can sit flat, but doesn’t leak the punch.
- Add the scooped-out watermelon, along with the lemon juice, honey, apple juice, and chocolate mint to the blender.
- Blend! Once the punch is blended to your liking, pour it into the watermelon shell or a serving pitcher.
- Slice the lemon and wash the raspberries, adding them both to the punch. Serve cold on a warm day and share the love!
Flower Cupcakes
By Eliza Neeley
Spring is here. Finally the sun is shining and the flowers are blooming. What better way to enjoy spring than to devour it? Now you can! These colorful flower cupcakes ensure instant happiness and a lifetime full of vibrancy.
Ingredients:
Chocolate cake mix
Cupcake pans
Cupcake liners
Frosting ingredients:
¾ cup butter
3 and ¾ cups powdered sugar
3 tablespoons milk
½ teaspoon vanilla
Decoration ingredients:
Marshmallows
M&Ms
Jelly beans
Mini M&Ms
Mike and Ikes’
Green Sour Punch Bites
Fake Grass:
Green food dye
1 cup Coconut flakes
1 teaspoon water
Instructions:
- Purchase chocolate cake mix and simply follow their instructions to make the cupcakes. Or make your own cupcakes if you possess the time and skill.
- Once the cupcakes are baked and cooled, transfer them to your decorating station!
- To make frosting, beat butter and ⅓ of the powdered sugar until creamy.
- Beat in milk, vanilla, and the remaining powdered sugar until smooth. Set frosting aside.
- To make fake grass, mix water, coconut flakes, and green food dye until the coconut flakes resemble grass. You are now ready to decorate!
- Cut up the marshmallows to make flowers and cut up the green sour punches to make stems.
- Decorating doesn’t really require instructions. Just let your creativity take over and make some pretty flowers!
Pumpkin pie smoothie
By Eliza Neeley
Pumpkin pie is the epitome of festive fall food. It guarantees a happy spirit, and any sane person can’t get enough of it. As an alternative to inhaling it or injecting it into your veins, pumpkin pie can now be enjoyed through smoothie form! Because Sonoma “cold weather” is rarely actually cold, this bundle-of-fall thrown in a blender is a way to experience seasonal flavors in style. As a source of Vitamin A, potassium, fiber and protein, you can pretend to be healthy while enjoying a traditional dessert!
Ingredients:
⅔ cup pumpkin puree, ⅔ cup milk, ¼ cup vanilla greek yogurt, 2 tbs. honey, 1 frozen banana, ¼ tsp. pumpkin pie spice, ½ tsp. cinnamon, blender
Method:
There really are no specific steps to making this smoothie. Basically, once all the ingredients are measured, throw them into a blender and press start. Once the smoothie is at the optimal smoothness, pour the smoothie into a cup and drink it.
*Helpful hint: Add extra milk if the smoothie resembles soft-serve ice cream, because this is a smoothie recipe, not a soft-serve ice cream recipe.
*Helpful hint 2: Unless you enjoy pumpkin-covered walls, keep the top on the blender while blending.
DIY chocolate Easter nests
By Eliza Neeley
Have you ever thought, “What could I possibly do with these extra chow-mein noodle snacks and chocolate eggs?” If so (or not), these scrumptious nests require little time and are ridiculously adorable Easter treats.
Ingredients:
2 cups chocolate chips, 2 cups peanut butter chips, 4 tablespoons of unsalted butter, 5 cups crunchy chow-mein noodle snacks, mini chocolate eggs (or Jordan Almonds, or anything egg-shaped) wax or cookie sheet paper, microwave-safe bowl, vegetable oil (optional).
Instructions:
1. Begin by covering a table or baking sheet in wax paper. This will be where the nests set to dry, so they should be in a safe, undisturbed place.
2. Cut the butter into a few slices, making it easier to melt. Then pour the chocolate and peanut butter chips and butter into a microwave-safe bowl. Melt the chocolate in a microwave on high, taking it out to stir every 30 seconds, until nice and creamy.
3. Mix the the chow-mein noodles, evenly covering them in the chocolate mixture. Next, drop spoonfuls of the mixture onto the wax paper station. Using two spoons, or your own two thumbs, shape these noodle piles into nests by indenting the centers. Then give yourself a pat on the back: you’re doing great.
4. Artfully place a couple of candy eggs in each of the nests. Let the nests dry and then show them off to all of your friends!
DIY Poppin’ Peanut Butter
By Eliza Neeley
Ingredients:
1 cup honey, ¾ cup sugar, 1 ¼ cup peanut butter, 1 teaspoon vanilla, 1 teaspoon salt, 1 cup chocolate chips, 1 cup peanuts, 3 bags of popcorn (around 18 cups), cookie sheet paper and a cookie sheet
Instructions:
1. Begin by popping all the popcorn and pouring it into the largest bowl you own.
2. Mix the peanuts and chocolate chips with the popcorn, in this monstrosity of a bowl.
3. Next, heat 1 cup of honey and ¾ cup sugar in a sauce pan over medium heat, until sugar dissolves (about 5 minutes). Stir constantly to avoid intense clumping.
4. Turn the heat to low and stir in 1 ¼ cups peanut butter, 1 teaspoon vanilla, and 1 teaspoon salt.
5. Pour this lovely sauce over the popcorn mixture and toss until coated evenly.
6. Spread the popcorn on cookie sheet paper, letting it rest until cool and dry.
Saint Patrick's Day DIY: How to make a Lucky Banner
By Eliza Neeley
Whether your Irish heritage is meaningful, minor, or non-existent, Saint Patrick’s Day is a holiday worth celebrating. You might as well enjoy it! It’s a time of leprechauns, rainbows, gold, and seas of green-clad people. There’s no better way to join in the fun than sporting this lucky banner.
Supplies:
Green paint, paint brush, old book, scissors, access to a printer, hole-puncher, string or ribbon of your liking
Instructions:
1. Begin by cutting out seven pages from the old book and hole punching into the tops of each. Try to do this evenly, otherwise, the banner will hang wonky.
2. Find a shamrock clip-art online and a fun font for the word “lucky.” Make sure everything will fit on the book pages. Next, hit print, and then cut out each letter and the shamrock. These will act as stencils.
3. Trace the letters and two shamrocks onto the seven book pages, and then paint the insides green. Using skills developed in kindergarten, make sure to stay inside the lines to make a beautiful banner.
4. Once the paint is dry, string ribbon through the hole-punched holes, and voilà, a spirited banner is ready to be hung proudly!
DIY Not an average cup of cocoa
By Eliza Neeley
Although the holiday season has officially come to a close, the cold weather stretches on for months. As El Niño storms on, the only real survival tool needed in Sonoma is the warm mug and the sweet taste of hot cocoa, but day after day, that powder mix becomes dull. This peanut butter hot cocoa recipe will spice up that powder packet in the pantry while making a hot cocoa master out of anyone.
Ingredients:
Milk, your favorite mug, spoon, whipped cream, standard hot cocoa mix, vanilla extract, Reeses *peanut butter chips, small pot, ¼ teaspoon
Instructions:
1. Begin by pouring a mug-full of milk, a small handful of peanut butter chips (around a ¼ cup), a half handful (around a ⅛ cup), and ¼ teaspoon of vanilla into into the small pot.
2. Turn heat to medium-high and stir continuously. Remove from heat once the the peanut butter and chocolate chips have melted, there will be some left-over residue. These first two steps can also be completed in a microwave by keeping the mixture inside of the mug and taking it out to stir every 30 seconds.
3. Add a small spoonful of hot chocolate mix to the hot cocoa concoction. Top it off with a swirl of whipped cream and a couple of peanut butter chips.
4. Enjoy the warm mug of winter happiness.
*This recipe can be replicated with any type of chip, if peanut butter is not a personal favorite. Choose any chip from peppermint, to white chocolate, to butterscotch, to dark chocolate, the possibilities are endless.
Tip: Adding a little coffee to this recipe results in an off-the-charts mocha.
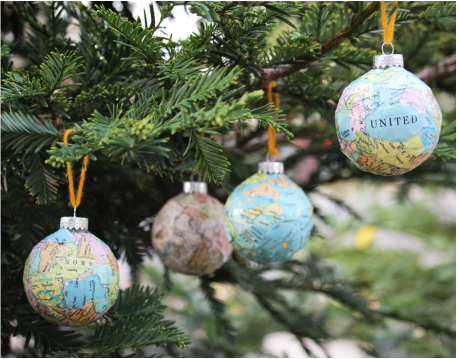
DIY Earth-friendly ornaments
By Eliza Neeley
Decoupage map ornaments are perfect for any world traveler (or the wanna-be-world-traveler who is trapped in Sonoma). With a few simple steps, you can recycle an old map while creating colorful ornaments which will complement a unique Christmas tree. These creative crafts will put to shame store-bought ornaments and bring Santa to a state of jealousy.
Supplies:
Mod Podge glue, foam paintbrushes or sponges, unwanted maps, styrofoam cups, glass ball ornaments (can be purchased at Michael’s Craft Store), pencils
Instructions:
1. By sticking a pencil through one of the styrofoam cups and flip the cup upside down. This will act as a holder for the ornament to dry on. 2. Rip the map into about one-inch pieces, not worrying about being exact.
3. Remove the metal hanger from the ornament--it should pull out easily--and then place the ornament on the styrofoam-cup contraption. 4. Begin the glueing process. Using the foam brush, smear Mod Podge onto a small section of the ornament and stick on one of the ripped-map pieces. Paint over the map piece with Mod Podge and push down all the sides sticking up. Repeat this process until the ornament is completely covered, with no blank spaces.
5. Let the ornament dry on the styrofoam-cup contraption. The ornament may look messy, but the Mod Podge will dry clear, with a shine. When dried, reattach the metal hanger and admire the beautiful creation.
*Tip: If you don’t have an old map lying around, I found a world atlas at a second-hand store for 50 cents.
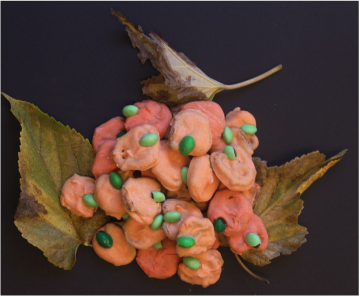
Treat or Treat? Edible Halloween DIYs
By Eliza Neeley
With these simple and spirited pretzel pumpkins, real pumpkins will no longer matter.
Ingredients:
Pretzels, Ghiradelli White Melting Wafers (in Safeway and Lucky’s baking sections), orange food dye (or mix red and yellow), green M&M's, knife, cutting board, parchment paper, microwaveable bowl, vegetable oil (optional)
Instructions:
1. Melt the chocolate in the microwave on high, taking it out to stir every 30 seconds, until melted and creamy (Directions for melting are also on Ghiradelli package).
2. While waiting for the chocolate to melt, cut the M&M's in half, to make the little pumpkin stems. M&M's are difficult to cut, so be careful as to not cut off any fingers when completing this step.
3. Once the chocolate is melted and at a smooth consistency, add food dye until the chocolate is a nice pumpkin-y orange.
4. Lay the parchment paper on a counter. Dip pretzels into the now-orange melted chocolate, place them onto the parchment paper, and then add the halved M&M's on top. This step must be done quickly before the chocolate becomes hardened.
*Tip: If the chocolate is hardening too quickly, add just a little vegetable oil and mix.
